CONSTRUCTION
In this project, four 180 degrees servos are used in order to drive the robotic arm.
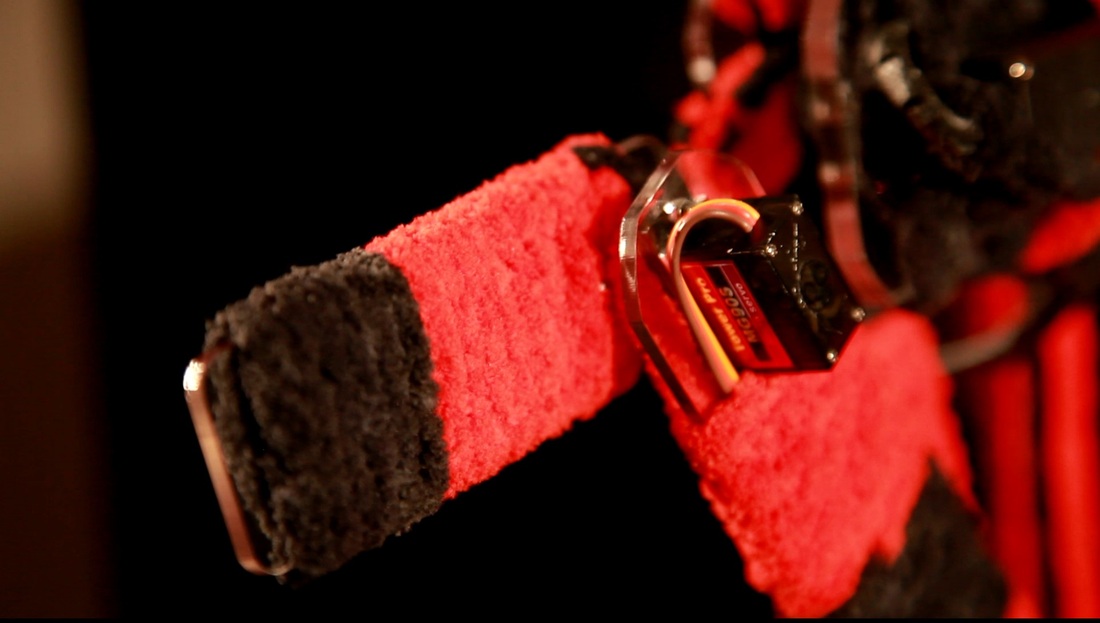
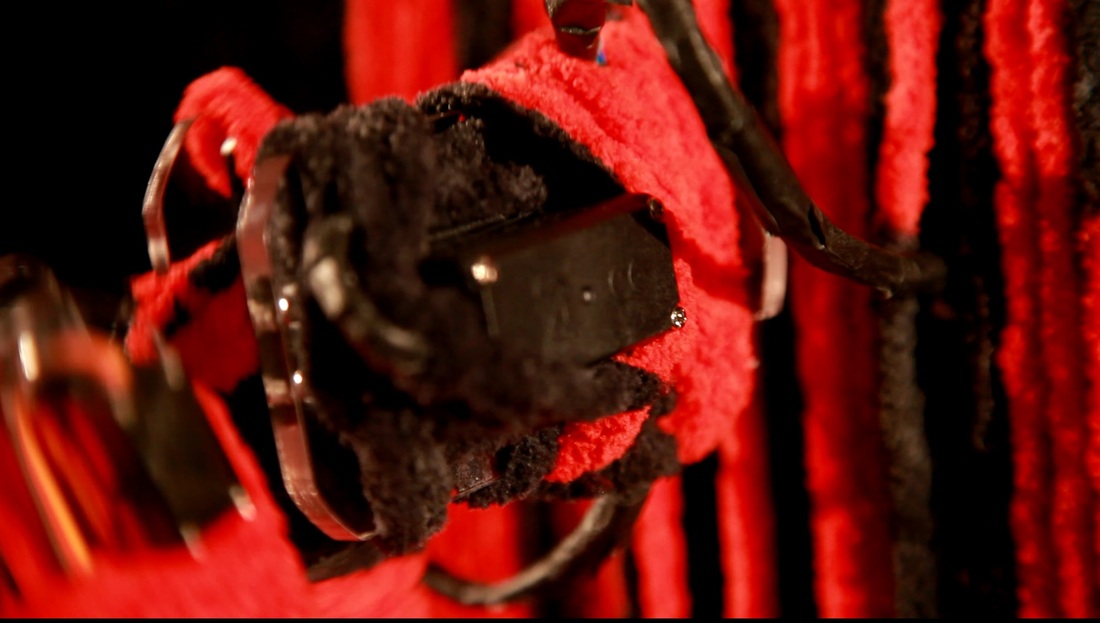
We designed the model of the arm and used acrylic as the skeleton. Based on the rotation of servos, the arm could point to any position within the limit range. The movement is driven by four servos and the servos are driven by Arduino Uno. The PCB circuit is designed by us including a bluetooth 2.0 as the communication port between Arduino and Computer. From the PC port, we analyze the Leapmotion data using processing, then the data will be received through bluetooth. Finally, the position of our hands could be mapped into the robotic arm.
We designed the model of the arm and used acrylic as the skeleton. Based on the rotation of servos, the arm could point to any position within the limit range. The movement is driven by four servos and the servos are driven by Arduino Uno. The PCB circuit is designed by us including a bluetooth 2.0 as the communication port between Arduino and Computer. From the PC port, we analyze the Leapmotion data using processing, then the data will be received through bluetooth. Finally, the position of our hands could be mapped into the robotic arm.
Materials and Components:
Servo x 4
laser cut acrylic : 3mm & 5mm
Arduino Uno
Leapmotion
PCB board (self design circuit)
Servo x 4
laser cut acrylic : 3mm & 5mm
Arduino Uno
Leapmotion
PCB board (self design circuit)
Positioning using IK (inverse kinematics)
this link is the concept of following coding:
http://uselessrobot.weebly.com/working-histroy/idea-about-building-a-robotic-arm
this link is the concept of following coding:
http://uselessrobot.weebly.com/working-histroy/idea-about-building-a-robotic-arm
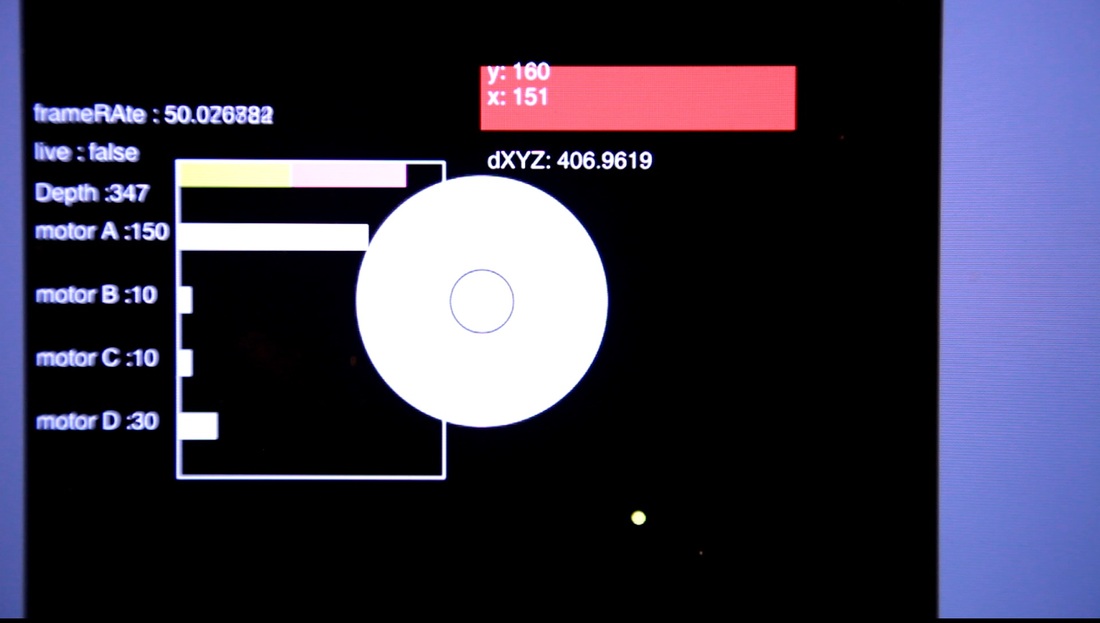
There are 4 servos, in order to explain them in a easy way, I divide them into servoA, servoB, servoC, servoD.
Step 1)
ServoA will find the angle, which constrains the XY-position of finger, center point of the root of the arm and center point of ServoB in plane XY on a straight line.
Processing code:
dXY = sqrt( sq( sX - (width/2) ) + sq( sY - (height/2) ) );
Left Hand side:
apos = 70 + (int) (degrees( asin( (height/2 - sY) / dXY ) ) );
Right Hand side:
apos = 70-(int) (degrees( asin( (height/2 - sY) / dXY ) ) );
Step 2)
Servo B will find the angle, which constraints the XYZ-position of finger, the center of Servo B and the center of Servo C in plane-ServoB-Finger-ServoC on a straight line.
Processing code:
dXYZ = sqrt( sq(width/2 - sX) + sq(height/2 - sY) + sq(sZ) );
angleB = (int) degrees (asin(sZ/dXYZ) );
Left Hand side:
bpos_temp = 10 + (180 - angleB );
Right Hand side:
bpos_temp = 10 + angleB;
bpos = bpos_temp;
Step 3)
Adjust the distance by adjusting the angles of ServoB and ServoC
Processing code:
int angleCD = (int)(degrees(acos( dXYZ/(2*lBC) ) ) );
bpos=bpos-angleCD;
cpos = 140-2*angleCD;
Step 4)
The ServoD for pointing
Processing code:
dpos=180-2*bpos_temp+bpos + shakeAngle;
Arduino Parts
There is an order for servos' reaction. For example:
The ServoA has the highest priority and the ServoD has the least priority. ServoB will not react until ServoA closely adjusted to the correct angle which is sent from processing. Similarly, before ServoB almost reaches the correct angle, ServoC is not allowed to rotate.
it's like a children structure. The threshold for the determination of reaction is 10 degree. It means if ServoA now is 70 degree and correct angle now is 90degree, then ServoB is not allowed to react. If ServoA is 81 degree, then ServoB will start adjusting.
The reaction time of a servo is 1/100s. Processing will send data 8times/sec through bluetooth. the maximum chars are 32. Therefore, the slowest reaction time of Arduino will be approximately 3times per second.
